It’s really important to understand before you build a strong email infrastructure. If you want to see real results, you need to send emails in bulk—1,000 personalized emails every day.
Here’s how you can build a robust email infrastructure to achieve this.
Buying a Domain
First things first, you need to buy a domain. This is crucial because you shouldn’t use your primary domain for cold email outreach.
Instead, get secondary domains that are similar to your main domain.
Here’s a quick guide:
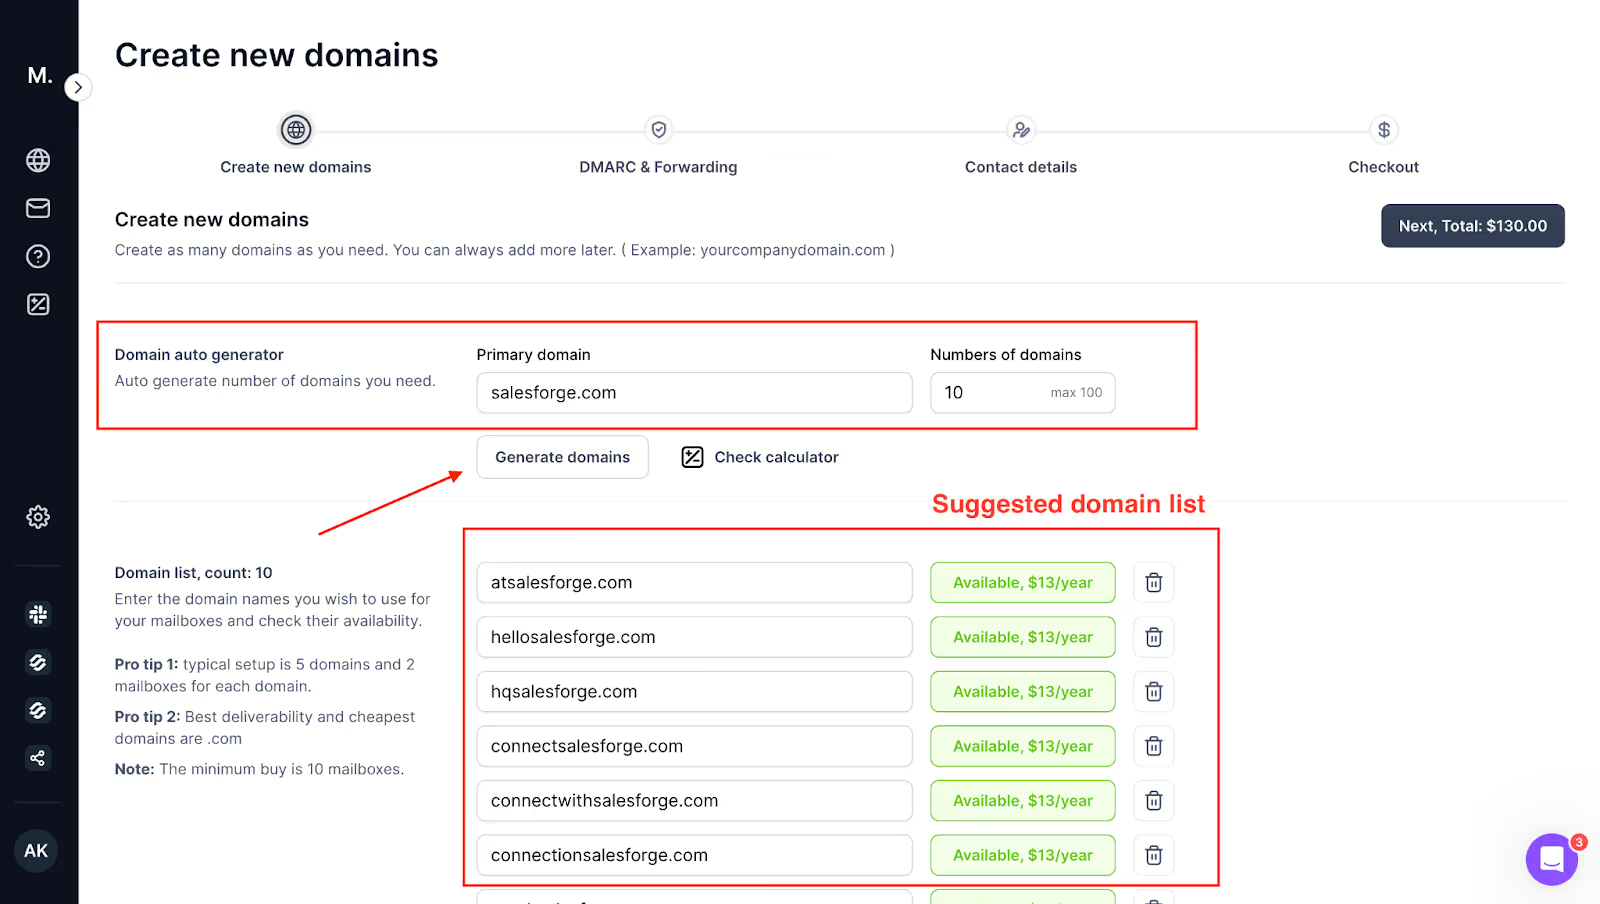
Buy 10 domains from Mailforge, GoDaddy or Google Domains. In our case, we are using Mailforge Domain auto generator to generate a list of 10 domains.
This image shows how to buy domains using Mailforge.ai
Choose domain extensions like .com, .io, and .ai. Avoid extensions like .info, .fr, .eu, and .buzz.
For example, if your primary domain is Salesforge.com, you can buy domains like:
Trysalesfoge.com
Getsalesforge.com
Salesforge.io
Teamsalesforge.com
Fromsalesforge.com
By doing this, you protect your main domain’s reputation and increase your chances of landing in your prospects' inboxes.
p=none means no action is taken; you can change it to quarantine or reject once you’re confident in your setup.
rua and ruf are optional fields to receive aggregate and forensic reports.
This image shows the adding of DKIM Record in DNS
Save the record and wait for it to propagate.
Check Your DMARC Records:
Use tools like MXToolbox to verify that your DMARC record is correctly set up.
This image shows the testing of DKIM record in MXToolbox
4. Set Up Forwarding and Redirection
Forwarding emails from your secondary domains to your primary domain ensures you don’t miss any replies and keeps everything centralized.
Steps:
Log in to your domain registrar (e.g., GoDaddy, Google Domains).
Navigate to the DNS or Email settings for your domain.
Set up email forwarding:
For GoDaddy:
Go to the Workspace Email section and select Manage next to the email you want to forward.
Under Forwarding, click Add Forwarding.
Enter your primary email address where you want to receive forwarded emails.
Save the changes.
For Google Domains:
Go to the Email forwarding section.
Enter the alias email address and the primary email address you want to forward emails to.
Save the changes.
Test Email Forwarding:
Send a test email to your secondary domain and verify it appears in your primary email inbox.
Important: You should also add 301 redirection from your secondary domain to primary domain. Because if someone is curious and wants to know more about your website, you don’t want them to land on an empty website.
You want them to be redirected to your main landing page or primary domain.
By following these detailed steps, you’ll ensure your email infrastructure is set up correctly, improving your email deliverability and helping you generate B2B leads effectively.
Now that your domains are set up, it’s time to configure your email accounts. Remember, for every domain that you buy, you should set up 3 to 5 mailboxes where you will be sending around 20-35 emails per day, Here’s what you need to do:
Important: We recommend hosting 2 domains per workspace and 10 email addresses per workspace. Make sure you only send 20-35 emails per account in the first month.
Note: Don’t link your google workspace with your main domain/address.
Email Warm-Up
Before you start sending bulk emails, it’s essential to warm up your email accounts. This process helps improve your email deliverability. Here’s a simple plan:
Send a small number of emails (around 20 per day) to your warm contacts.
Gradually increase the number of emails you send each day.
Use a tool like Salesforge to automate this process.
By following these steps, you’ll build a strong email infrastructure that supports sending 1,000 personalized emails every day.
This setup will help you generate high-quality B2B leads effectively.
Ready to dive into the next step? Let’s go!
Remember: We recommend warming up for 2–3 weeks at 30-40 emails per day. After launching your cold email, you reduce your warm-up by half.
Calculated Cost to Set Up an Email Infrastructure
To generate 10-20 B2B leads by sending 1,000 emails every day, you need a robust email infrastructure.
Let's break down the costs and the numbers involved in this setup.
Crunching the Funnel Numbers
Here’s a quick overview of the funnel metrics based on sending 1,000 emails per day:
Domains: You need 10 domains to distribute the email sending load and avoid spam issues. If you buy one domain from Godaddy you will approximately pay $13 per domain.
Cost: $130 for 10 domains (from GoDaddy or Google Domains).
Google Workspace Email Addresses: You need 3 email addresses per domain. $3 per email address per month.
Note: Setting up domains and email itself is a complex process especially when you’re dealing with multiple domains and multiple email accounts like in the above case. Here you can use Mailforge.ai which allows you to manage your domains and accounts everything at one place. Mailforge automatically sets up DKIM / DMARC / SPF settings for new domains automatically, saves tons of time. Also, if you use Mailforge comparatively you will save $60, because GoDaddy+Workspace will cost you $270 for 10 domains and 3 email accounts which if you use Mailforge the same will cost you $210.
2. Email Validation
Email Validation Credits: To ensure high deliverability, validate your email list.
Cost: $20 for 20,000 validation credits via Salesforge.
3. Email Sending Tool
Salesforge: A tool to send highly personalized emails.
Cost: $952 for 20,000 highly personalized emails per month.
Total Monthly Costs
10 Domains: $130
Google Workspace Email Addresses: $90
Email Validation: $20
Salesforge Email Sending Tool: $952
Total Cost for the 1st Month = $1,192 and $1092 thereafter.
Estimated Revenue and ROI
Revenue from Closed Deals
Closed Deals: 53 deals/month
Average Deal Value: $1,000 per deal
Total Revenue: 53 deals × $1,000/deal = $53,000/month
To set up an email infrastructure capable of generating 10-20 B2B meeting-ready leads every day by sending 1,000 emails, you’ll need an initial investment of $1,242.
With this setup, you can potentially earn $53,000 per month from closed deals, resulting in an impressive ROI of 4,346%.
Making List of Potential Buyers - Building B2B Contact Database
Now, let's move to another important step of lead generation which is List Building.
To generate 10-20 B2B meeting-ready leads every day, you need to start by building a hyper-targeted prospect list. This means identifying exactly who you are going to target.
Once you know your ideal customer profile (ICP) – the specific personas who are most likely to benefit from your product or service – you can begin searching for these prospects using various tools available in the market.
Building a Hyper-targeted List of B2B Prospects
One of the most effective tools you can use is Clay. Other alternatives include LinkedIn Sales Navigator, Apollo, or Lemlist, but for this guide, let's focus on Clay.
Define Your Target Persona:
Think about the industries, company sizes, and roles that match your ideal customer profile.
Consider geographic locations and any other relevant criteria that define your target audience.
Use Clay to Build Your List:
Log in to Clay and start a new project.
Use the search features to filter prospects based on your target persona criteria.
This image shows the Clay workflow
Utilize advanced filters to narrow down your list to those who best fit your ideal customer profile.
This image shows the usage of Advanced Filters To Hyper-Target Prospect in Clay
Enriching Data with Clay:
Why Enrich Data?: Enriching your contact data provides additional information about your leads, making your outreach more personalized and effective. This can include social media profiles, phone numbers, job roles, and company details.
How to Enrich Data in Clay:
Select Contacts for Enrichment: After verifying emails, select the contacts you wish to enrich.
Enrichment Options: Click on the “Add Enrichment” option within Clay.
This image shows how to choose data points to enrich data in Clay
Choose Data Points: Select the data points you want to enrich (e.g., LinkedIn profile, company information, phone number).
Run Enrichment: Let Clay’s system gather the additional data from its extensive sources. This might take a few minutes depending on the volume of contacts and data points.
This image shows the Data Enrichment in Clay
Review Enriched Data: Once the process is complete, review the enriched information to ensure accuracy and completeness.
Benefits of Using Clay for Enrichment:
Comprehensive Data: Clay pulls data from over 70 sources, ensuring you get the most comprehensive and accurate information.
Improved Personalization: With enriched data, you can craft highly personalized emails, increasing the likelihood of engagement and positive responses.
Time-Saving: Automating the enrichment process saves you hours compared to manual data gathering.
Extract Contact Information:
This image shows how to export Verified Lead List From Clay
Once you have your filtered list, extract contact details such as names, email addresses, and company information.
Make sure the data is accurate and up-to-date.
Verifying Contact Data
After verifying and enriching emails within Clay, it’s crucial to further validate them to ensure they’re deliverable.
This extra step helps you avoid bounces and maintain a good sender reputation.
Generating 10-20 B2B meeting-ready leads every day requires more than just sending emails. You need to make sure your emails land in the primary inbox, not the spam folder.
We’ve already covered email warm-up, so now let's look at other steps to keep your emails out of spam.
Ensuring Emails Don’t Go to Spam
To keep your emails out of the spam folder, follow these practical steps:
Avoid Spam-Trigger Words: Using certain words can trigger spam filters. Avoid words like "Buy," "Free," "Exclusive offer," and "Order." These words can make your email look suspicious and more likely to be flagged as spam.
Specific Examples:
Instead of saying "Buy now," use "Get your copy."
Replace "Order today" with "Secure your spot."
Avoid offers like "Buy one, get one free" or "Exclusive deal."
Reduce Links in Your Email Copy: Having too many links in your email can make it look suspicious to spam filters.
Practical Tips:
Limit your email to 1-2 links. For example, include only a link to your website and one to a case study.
Avoid using cloaked links (e.g., bit.ly) and use full URLs.
Ensure your email signature contains only essential links, like your website and LinkedIn profile.
Keep an Unsubscribe Link: Always include a clear unsubscribe link in your emails. This helps you comply with regulations like the CAN-SPAM Act and GDPR and shows respect for your recipients' preferences.
Why It’s Important:
Provides a way for recipients to opt out easily, reducing the chances of spam complaints.
Maintains a positive sender reputation.
Helps avoid legal issues and builds trust with your audience.
This image shows how to activate the unsubscribe button in Salesforge
Maintain High Deliverability and Low Bounce Rate:
Monitor Spam Complaints: Regularly check for spam complaints and adjust your email strategy to minimize negative interactions.
Maintain Sender Reputation: Use best practices like email authentication (SPF, DKIM, DMARC) and send emails from a consistent IP address.
Adhere to Sending Limits: Respect the daily and monthly email sending limits set by your email service provider to avoid being flagged by ISPs.
By following these practical steps, you’ll increase your chances of generating meeting-ready leads every day while keeping your emails out of the spam folder.
Starting Your Hyper-Personalized Campaign For Better Response [Step-by-Step]
Now that you have a verified and enriched list of leads, it’s time to start your hyper-personalized cold email campaign.
This step-by-step guide will help you set up your campaign on Salesforge, ensuring you generate 10-20 B2B meeting-ready leads every day.
Step-by-Step Guide to Setting Up Your Cold Email Campaign on Salesforge
1. Adding Leads
First, you need to add your leads to Salesforge. Follow these steps:
Login to Salesforge: Open Salesforge and log in to your account.
Import Leads: Click on the “Contacts” section and choose the “Add to Contact” option.
This image shows how to add contacts in Salesforge.ai
Upload CSV: Select the CSV file with your verified and enriched leads and upload it.
Map Fields: Make sure that all the fields (like name, email, company, job title) are correctly mapped.
With Salesforge, you can validate emails directly for better deliverability, so you don’t need to use additional tools like Neverbounce. Here’s a snapshot after you’ve completed the validation.
This image shows the email validation in Salesforge.ai
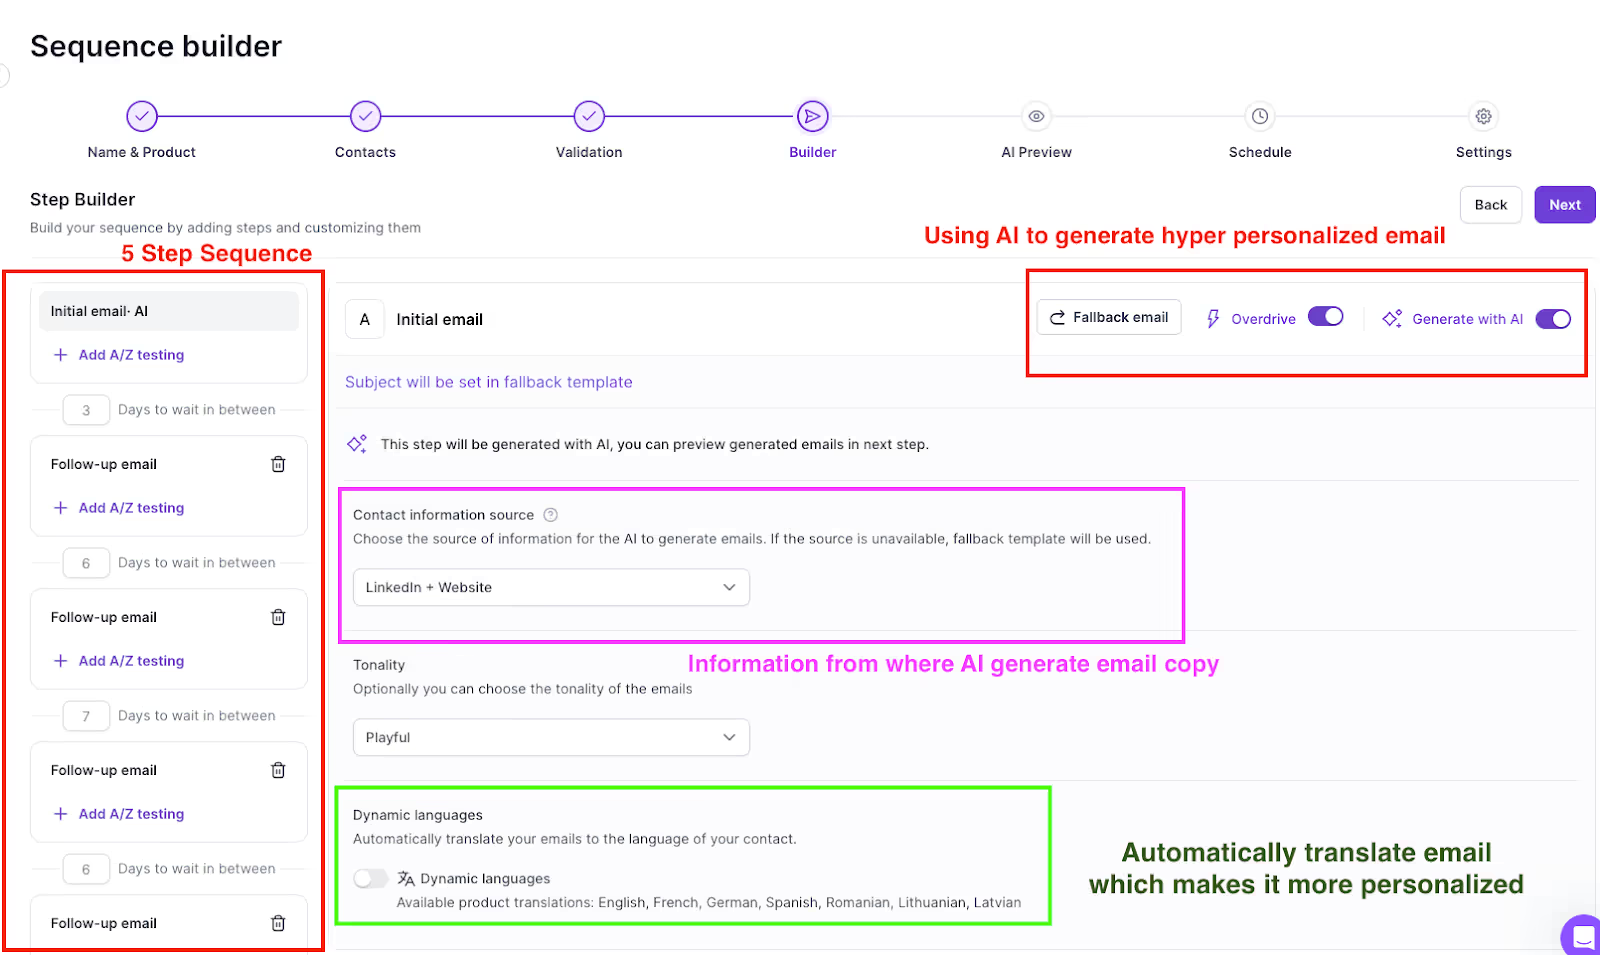
2. Building a 5-Step Highly Personalized Automated Sequence
Creating a personalized email sequence is key to engaging your leads. Here’s how to set up a 5-step sequence:
This image shows the sequence builder in Salesforge.ai
Step 1: Draft Initial Email:
Personalize the Subject Line: Use the recipient’s name or company to make it stand out.
Write a Personalized Introduction: Mention something specific about their company or role. You can use Salesforge AI to craft hyper-personalized email based on their LinkedIn profile and Website.
Include Value Proposition: Clearly state how your product/service can solve their problem.
Call to Action: End with a clear and compelling call to action (e.g., scheduling a meeting).
This image shows how to generate email preview using AI
Step 2: Follow-Up Email:
Timing: Schedule to send 2-3 days after the initial email.
Content: Reference your previous email and add more value or insights.
Call to Action: Encourage a response or meeting.
Step 3: Second Follow-Up:
Timing: Schedule 4-5 days after the first follow-up.
Content: Share a case study or testimonial to build trust.
Call to Action: Reinforce your request for a meeting.
Step 4: Final Follow-Up:
Timing: Schedule 6-7 days after the second follow-up.
Content: Summarize the benefits and ask if they have any questions.
Call to Action: Provide a last chance to schedule a meeting.
Step 5: Closing Email:
Timing: Schedule 1 week after the final follow-up.
Content: Politely mention this will be your last email and reiterate the value of your offer.
Call to Action: Include a link to book a meeting or request feedback.
3. Scheduling (Optional)
While scheduling your emails is optional, it can help manage your campaign better:
Use Salesforge’s Scheduling Feature: Set the specific dates and times for each email in your sequence to ensure they are sent at optimal times.
This image shows Scheduling Emails on Saleforge.ai
Consider Time Zones: Schedule emails according to the recipient’s time zone to increase the chance of them being read.
4. Tracking Emails
Tracking your email performance is crucial to optimize your campaign and generate B2B leads effectively:
Monitor Open Rates: Check how many recipients are opening your emails. This helps you understand if your subject lines are effective.
Track Click-Through Rates (CTR): See how many recipients are clicking on links within your emails.
Analyze Response Rates: Keep track of the number of replies you receive. High response rates indicate effective email content and personalization.
Adjust Based on Data: Use the data from your email tracking to tweak your subject lines, email content, and timing for better results.
Conclusion: How much will it cost you to generate 10-20 B2B leads every day via cold outreach?
To generate B2B leads effectively, you'll need an initial investment of $1,242. This includes costs for domains, email accounts, email validation, and the Salesforge email sending tool. With this setup, you can potentially earn $53,000 per month, resulting in an impressive ROI of 4,168%.
By following the steps outlined in this guide, you'll:
Set up a strong email infrastructure.
Build a hyper-targeted prospect list.
Launch a personalized email campaign.
Track and optimize your email performance.
With this approach, you can expect to generate over 50 meeting-ready B2B leads every month, significantly boosting your business growth. Try now
Discover 7 best RocketReach alternatives (free + paid) for better lead generation. Compare features, pricing, and find tools that fit your sales workflow.


![7 Best RocketReach Alternatives [Free+Paid] For Lead Generation](https://cdn.prod.website-files.com/6436c3ac9f9fd0594d00b9fc/67f4d0a6342a2f326e7d2b75_7%20Best%20RocketReach%20Alternatives%20%5BFree%2BPaid%5D%20For%20Lead%20Generation-cover-image.avif)
